
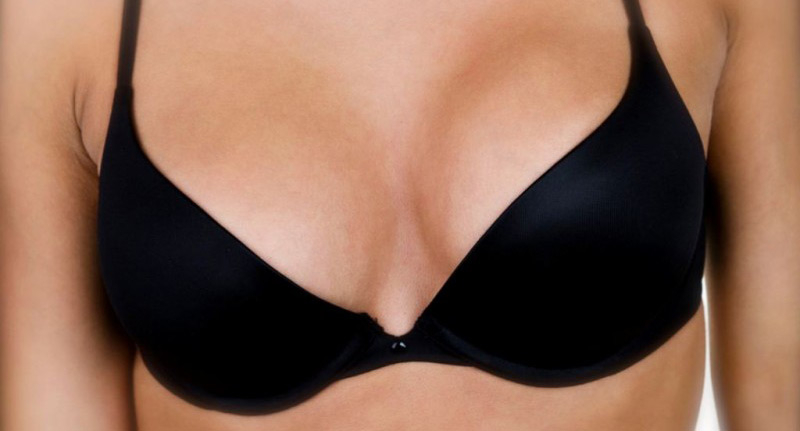
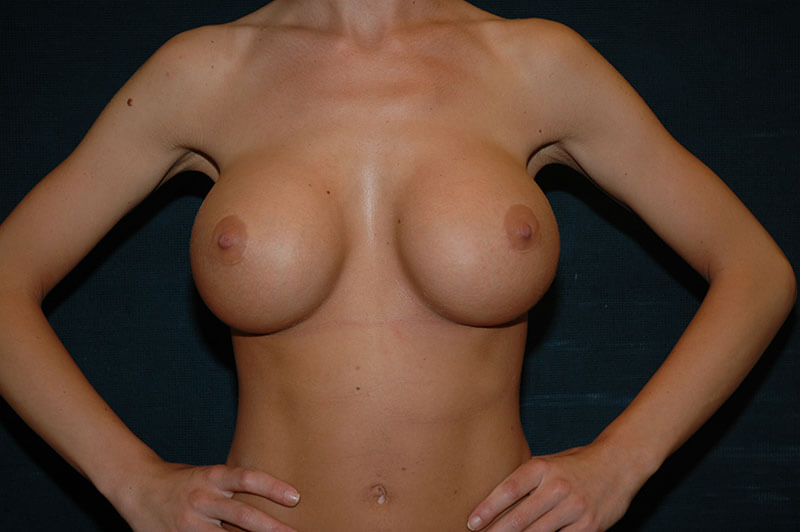
Breast Augmentation Revision Surgery
Revision Surgery
Deciding to go ahead with revision surgery can be very scary; trust me I have had 3 breast augmentations so I do understand.
I have put this post together to provide all the information you need, to make an informed decision to have the best possible, long term outcome.
My first post on Breast Augmentation has all the basic information about how to choose the implants and surgery methods that will help you to achieve the result you want the first time.
One of the main reasons for revision surgery, apart from correction of complications, is a desire to have larger breasts, a different shape or a more pronounced cleavage. Revision surgery is also desired when patients need to change an implant that has been withdrawn from the market or desire smaller breasts or an uplift. This is not always possible when you are small busted or lack breast tissue and desire large implants or want a more natural-looking, breast augmentation. When revision surgery is done to correct complications, multiple options may be available.
COMMON CAUSES OF COMPLICATIONS
- Contamination of the implants through lack of care.
- Operating theatre is not sterile.
- Short nipple/fold distances.
- Over dissection of breast tissue creating an incorrectly sized pocket for the implant, allowing it to displace from the original position.
Over dissection of the pectoral muscle. - The implants are too big or too wide for your body.
- Your implants were positioned incorrectly or using poor technique.
Capsular contracture. - Breast lift not performed at the time of augmentation.
Weight gain/loss and pregnancy.
CORRECTION OF COMPLICATIONS
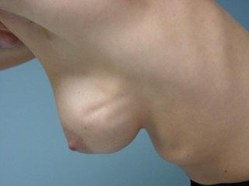
CAPSULAR CONTRACTION
This is one of the most common complications of breast augmentation and revision surgery. Late-onset of capsular contraction can indicate a ruptured implant and should be checked immediately with a mammogram.
Once corrected it is still possible for capsular contraction to occur again.
There are 4 stages of capsular contraction
Grade 1:
Grade one capsular contracture is asymptomatic (producing or showing no symptoms). The formation of scar tissue around the implant does not interfere with the size, shape or texture of the breasts. The breasts look natural and remain soft to the touch.
Grade 2:
Grade two capsular contracture usually presents itself with only minor cosmetic symptoms. The breasts will usually appear normal in shape but feel somewhat firm to the touch.
Grade 3:
Grade three capsular contracture presents itself with obvious cosmetic symptoms. The breasts will be firm to the touch and appear misshapen. However, this grade of capsular contraction often doesn’t cause much pain.
Grade 4:
Like grade three capsular contracture, grade four capsular contracture causes the breasts to become hard and misshapen. Patients with grade four capsular contracture also experience breast soreness; their breasts will often be tender and painful to the touch.
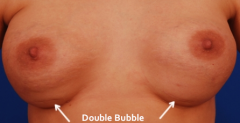
Capsular Contraction: Grade 3/4 evident in the right breast
Revision Options
Capsulectomy
Treatment of capsular contraction will normally first involve, complete removal of capsule and implant. Internal, radial scoring of breast tissue at the level of the inframammary fold which allows the IMF crease to expand may also be carried out.
Open Capsulotomy
There is also the option for an open capsulotomy, your plastic surgeon will attempt to cut open the tissue capsule around the implant by making small incisions and may also remove some of the capsule. The goal is for the capsule to pop open, giving the implant more room to move around. In some cases, your surgeon will also remove your existing implant and replace it with a new one. however, this is not as likely to prevent a reoccurrence of capsular contraction and many surgeons no longer perform this procedure.
Subglandular implants with capsular contraction
After removing the implant and capsule your surgeon may advise you change to a submuscular placement, as it is associated with lower rates of capsular contraction.
Submuscular implants with capsular contraction
Removing the implant and capsule in the submuscular space may be difficult, especially if the capsule is firmly attached to the chest wall. Changing to a neosubpectoral placement may provide an alternative solution – described below under recent advancements.
Prevention techniques to reduce the recurrence of capsular contraction
The “no-touch” technique
To prevent any contamination the sterile package containing the implants is opened only at the moment they are ready to be inserted into the body. No one handles the implants apart from the surgeon. The skin of the breasts is re-sterilized with betadine, the operative field surrounding the breasts is redraped with new sterile towels, and the surgeon replaces his gloves. The new gloves are then washed to remove any powder prior to picking up the implants. When the implants are inserted into the body, care is taken to ensure the implants do not touch any instruments, the skin of the patient, or any sterile drapes surrounding the operative field.
All of these measures help ensure that no foreign substances attach themselves to the implant, which could inflame the surrounding tissue and cause complications such as capsular contracture.
Closed filling system
(when saline implants are being used)
With this technique, the saline used to fill the implants flows from a sterile bag through sterile tubing into the sterile implant. This eliminates any possibility of foreign bodies or bacteria or fungus entering the implants.
Alternative Treatments
Treatment with Zafirlukast (Accolate)
Zafirlukast (brand name: Accolate) taken twice a day for 90 days has been shown to result in a softening of the scar tissue around the implants in approximately 50% of cases. Accolate has also been shown to decrease the recurrence of capsular contracture in patients undergoing capsulectomy Suggested dose: 20mg Zafirlukast twice daily for 3 months.
The same dose is used for preventive treatment 2 weeks prior to surgery.
Risks:
Allergic rashes. Long term effects are unknown as Zafirlukast has only been available in the US since 1999.
Other benefits:
Zafirlukast is also used for chronic rhinitis, so patients may notice improved breathing and decreased snoring.
Treatment with Aspen multi-energy therapy
During Aspen therapy, a special device (the Aspen harmonizer) is applied to the patient’s breast tissue, without any incisions being made. The Aspen harmonizer delivers precisely controlled, ultrasound waves to the patient’s tissue, encouraging the growth of healthy collagen. This increases elasticity within the breast capsule around the implant, making the breasts feel soft and pliable again. Furthermore, the ultrasound waves used during Aspen therapy have been shown to increase the effectiveness of antibiotics in combating biofilm.
Aspen therapy is usually administered over two to three weeks in combination with antibiotic therapy to target the root cause of capsular contracture. The Aspen method has been shown to be effective for grade two and grade three cases of capsular contracture. Grade four cases may require surgical intervention.
IMPLANT MALPOSITION
Implants will not always ‘settle’ as intended in the breast pocket created. This can result in a number of different complications.
The most common displacement issues are double bubble and bottoming out. However the implant can become displaced in any direction (laterally, medially, and less often superiorly) and often do so in an asymmetrical fashion, resulting in abnormal-looking breasts.
Double Bubble
The double-bubble deformity occurs when a breast implant sits lower than the original inframammary crease. It can occur when a breast implant is positioned below the old crease at surgery, a short nipple/fold distances often seen in patients desiring breast augmentation can result in the double-bubble deformity even when the surgeon has positioned implants in the appropriate position. The appearance of this deformity is due to the presence of breast parenchyma above the original crease, and thinner subcutaneous tissue without breast tissue, below the crease.
Revision Options
In most cases the surgeon will remove or reposition your current implants, adjusting the breast pocket, removing any scar tissue inside the breast that is affecting the positioning of your implants and place new implants if needed.
Alternatively, the breast crease can be modified. A small incision is made in the crease, which is then tightened and raised by placing sutures along the bottom of the breast. This eases the implant back into its proper position.
Another corrective action for double bubble involves removing the implants and placing new ones in front of the muscle. This placement can fill out sagging skin, but rippling may occur.
Double bubble deformity can also be caused by implants that are too big (heavy) for the chest wall or after pregnancy. In some cases to correct the double bubble, a breast lift (mastopexy) combined with submuscular placement might be recommended.
Alternative Treatments
The Shoelace Technique:
This technique is described in the Aesthetic Surgery Journal in July 2014 by Daniel Mills.
When the surgeon sees a double bubble appearance forming an external support is created around the breast, using two 54-inch flat shoelaces that are 3/4 inch broad. They are tied to provide a tight definition to where the surgeon wants the breast crease to actually lie.
It is worn by the patient sometimes on its own or sometimes with an under-wired bra for around 3-weeks.
It is not useful in treating old double bubbles that have formed, as it is then too late to be beneficial.
Fat Grafting
Normally done under a local anaesthetic.
Before the procedure, the double-bubble deficiencies and liposuction donor sites are assessed, measured, and marked with the patient standing. The volume of fat to be injected with each treatment is estimated by predicting the volume of soft tissue deficiency for each breast in the clinical double-bubble deficiency and adjusting for the low density of the fat graft material injected and a factor for predicted resorption.
Skin turgor, resistance to injection, and the thickness of tissue overlying the breast implant also need to be evaluated at the time of injection, with smaller than calculated volumes injected when clinically indicated. The fat graft is then obtained by hand aspiration from abdominal and outer thigh donor sites and with the patient in the supine position, injections are given in the subdermal and superficial breast tissue.
The implant must be protected and displaced cranially with one hand to prevent accidental perforations. Postoperatively, patients are treated with a sterile non-compression dressing on the breast for 2 days, followed by loose-fitting clothing without a bra for 3 weeks. The liposuction donor site is treated with compression for 10 days.
The contour of each breast and the visualization of a step-off between the breast tissue and implant will then be evaluated by the treating surgeon, 3 months after each fat transfer treatment. For patients requiring more than 1 fat transfer procedure, a repeat procedure can be done as soon as 3 months after each procedure.
Risks:
The fat can be reabsorbed or may become hard, calcifications can occur and regular monitoring with mammograms is advisable.
BOTTOMING OUT
This occurs when the implants slide down the chest creating an abnormal amount of volume in the lower part of the breast and can also result in the displacement of the nipples causing them to rise on the chest and/or point upwards. Although this can create a very ‘fake’ look, not all women feel unhappy with the appearance of their breasts when it occurs symmetrically and revision surgery is not always desired.
Revision Options
Capsulorrhaphy
A capsulorrhaphy repairs the inferior breast capsule utilizing permanent internal sutures and essentially shrinks or reduces the size of the implant pocket to keep your breast implant in their proper position and prevent its descent below your natural inframammary breast crease. Additionally scoring of the breast parenchyma to reduce the difference in tissue thickness above and below the crease may be done.
Depending on the particulars of a patients case, it may or may not be advised to also place ADM (or an acellular dermal matrix) in the inferior pole at the same time to help thicken up and support the inferior breast pole. This is commonly advised when a patient presents with thin skin and/or rippling of the inferior pole. If patients are also adamant about keeping a larger size implant which can put extra stress and weight on the pocket repair, ADM may be required. Permanent sutures to close off the lower part of the capsule are a very good technique to correct this problem.
Alternative Surgical Methods
Closed capsulorrhaphy
Normally done under a local anaesthetic.
This method corrects implant displacement by recreating a new inframammary fold with an external approach. The implant must be protected and displaced cranially with one hand to prevent accidental perforations.
The lower pole of the capsule is scraped with the cannula with the aim of provoking a fibrotic process and scarring adhesions. After this, a suture is performed by means of three nonabsorbable polypropylene external stitches deep to the periosteum of the sixth and seventh ribs, creating the new desired inframammary fold following the preoperative markings.
The skin is protected from the stitches using petrolatum gauze. This retention suture collapses the redundant capsule and keeps the implant in the desired position during the healing process. Stitches are removed on the fifth postoperative day. An elastic dressing to define the new submammary fold is worn for 1 week.
With this technique, the new inframammary fold is created by means of the stitches and the capsular adhesions caused by the cannula scrape.
MEDIAL DISPLACEMENT
Symmastia
Symmastia appears when the implants displace medially giving the appearance of breasts connecting in the middle of the chest. This can be just the skin tenting anteriorly away from the breastplate (sternum), or it can be an actual connection across the middle between the breast implant pockets.
Revision Options
Surgery will involve removing the implants and replacing them with new (usually smaller) implants. Also, your plastic surgeon will reattach the skin that has detached from the sternum using internal stitches and make adjustments to the pockets of tissue in the chest that hold the implants in place, often reinforcing their boundaries using a dermal matrix product (a skin substitute made mostly of collagen) or mesh.
Subglandular implants
If implants are placed above the muscle, a symmastia repair typically entails moving implants into the submuscular position. This will create a new pocket for the breast implant.
Moving the implants to a biplane position is another option. Explained below under recent advancements.
Another option is a two-stage operation:
First stage, medial capsulectomies.
The procedure involves reattaching the cut tissues back to the breast bone, and then removing the implants for at least 12 weeks before the new breast augmentation surgery is performed. Waiting 12 weeks will give the breastbone and the surrounding reattached tissue time to heal. After 12 weeks, the patient will undergo a secondary breast augmentation procedure. The surgeon will attempt to use previous incision locations when placing the breast implants to avoid the formation of additional scars.
Neopectoral Pocket –
This method involves a new surgical pocket is created, between the anterior capsule and the muscle. Explained below under recent advancements.
LATERAL DISPLACEMENT
This occurs when implants slide too far to the side when standing or lying.
Correcting Lateral Displacement
There are two primary options for correcting lateral displacement for submuscular implants:
Capsulorrhaphy
– During a capsulorrhaphy, the surgical capsule is tightened to prevent further sideways movement, or the outer edge may be closed off entirely with sutures. In some cases, a reconstructive tissue matrix such as Alloderm or Strattice may be incorporated for additional support.
The patient is marked in the standing position. If the lateral crease is displaced further laterally, a notation is made of the current and desired position of the crease. Unlike isolated lower pole stretch in the lower breast where excess skin can be removed with the incision hidden in the lower breast crease, excising the extra breast tissue on the side of the breast is not an option because the scar would be very noticeable. A compromise must be made and the lateral breast crease is moved inwards somewhat.
At surgery, an incision is made through the previous scar and the implant is removed. The inner surface of the breast pocket is lined with a thin scar tissue capsule. The other edge of the breast pocket needs to be pleated to the chest wall. A capsulorraphy is performed to suture the capsule from one side to the chest wall to close off some of the pocket. Occasionally, the capsular tissue is thin and will not hold sutures very well, so the repair will not hold. Seri surgical scaffolding sutured over the repair will add an extra layer of strength and support while it is healing.
The Seri will last for about two to three years, during which time the body will produce an additional three millimetres of extra tissue where the Seri was placed, giving a more permanent solution to the repair. When the Seri is absorbed by the body, the new tissue remains forever. This is a way to bioengineer extra tissue and reduces the risk of failure, of the repair.
Neopectoral Pocket –
Alternatively, the implant may be removed entirely, and a new surgical pocket is created between the anterior capsule and the muscle. Explained below under recent advancements.
SUPERIOR DISPLACEMENT
This occurs when the implants sit too high on the chest wall when they don’t settle enough or fail to stretch out the lower breast as much as expected.
This displacement may cause the nipple-areola complex to appear low or pointing downward. This can be corrected by removing the current implants and lowering the pocket.
Revision Options
The pocket is lowered resulting in the implants falling down into the pockets. This will give your breasts a nicer placement on your chest wall.
IMPLANT WRINKLING AND FOLDING
This occurs when the pocket s not correctly sized or there is a lack of soft tissue coverage and is more likely to happen with saline-filled implants.
Revision Options
Subglandular implants
Implants can be moved to the submuscular position to provide an extra layer of cover to help prevent rippling.
Fat grafting:
to provide an extra layer may also be offered. Explained above under Double Bubble complication.
Change of implants:
Change from saline to silicone may help correct the appearance of rippling. Sometimes the implant volume will need to be increased, more often with saline implants.
INFECTIONS
Infections can normally be effectively treated with antibiotics, however, sometimes it may be necessary to remove the implants, treat the infection and then replace them. Necrosis can result from an infection which is very serious and if left untreated is likely to result in implant extrusion.
IMPLANT EXTRUSION
This can happen when the skin over the implant has thinned too much, resulting in a lack of tissue coverage for the implant.
In some cases, the implant used to reconstruct the breast is too large, putting too much pressure on the skin.
You may develop an infection if you have an extruded or exposed implant. If your breast implant has already extruded or is about to extrude, your surgeon will have to remove it.
Revision Options
Immediate reconstruction
It may be possible to reconstruct your breast with an implant if you have enough healthy skin and tissue to support and cover the implant.
Delayed reconstruction
Your plastic surgeon might suggest that you first have a tissue expander (which stretches the skin to make room for the final implant) inserted for a few months. Normally this will then be replaced with a silicone-filled implant, however, you may choose to keep an expandable implant if you are happy with the way your breasts look.
Flap reconstruction
If you don’t have enough skin to stretch over an implant or the skin is somewhat thin, the best option may be to reconstruct the breast with a flap of tissue from another place on your body; this will be covered in my next post about breast reconstruction. In some cases, your plastic surgeon may recommend including a breast implant beneath the flap to add more volume.
IMPLANT RUPTURE
Your surgeon will need to replace the implant, you may choose to go bigger, or smaller or have an uplift at the same time.
Silicone Filled
When a silicone implant ruptures this may cause small tender lumps (silicon mass), which are only noticeable on breast scans.
When there is a concern about having another silicone implant a saline-filled implant may be chosen.
Saline Filled
When a saline implant ruptures it will deflate noticeably, the saline is safely absorbed by the body and expelled in urine. Another saline implant may be used to replace the ruptured one or you may choose to replace it with a silicone-filled implant as they have lower rupture rates.
KELOID SCARS
A keloid is a type of bulky scar that develops in the skin. Make sure you tell your surgeon that you have a tendency for keloids if an operation is planned; certain steps can be taken to minimise the chances of getting a keloid postoperatively. They can develop anytime (sometimes years) after injury/inflammation to the skin and start or stop growing at any time.
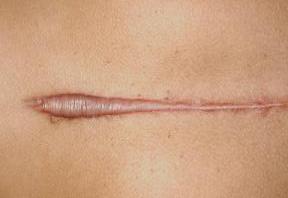
example of a keloid scar
Treatments include:
- Steroid injections.
- Applying steroid-impregnated tape for 12 hours a day.
- Applying silicone gel sheeting for several months
Other options include
- Freezing early keloid scars with liquid nitrogen to stop them growing.
- Laser treatment to reduce redness (but this will not make the scar any smaller).
- Surgery to remove the scar (although it can grow back and maybe larger than before)
BREAST LIFT/REDUCTION
You may decide you want your implants removed and not replaced. To maintain a nice appearance of the breasts a breast lift and reduction may be required. You may also require a breast lift even if you are choosing to keep your implants to achieve the best aesthetic appearance.
Usually, your surgeon will remove the extra skin from underneath your breasts. The skin and surrounding tissue will be tightened and your nipple moved to a higher position. Breast uplift surgery doesn’t significantly change the size of your breasts. Breast enlargement or breast reduction procedure can be done at the same time if you choose.
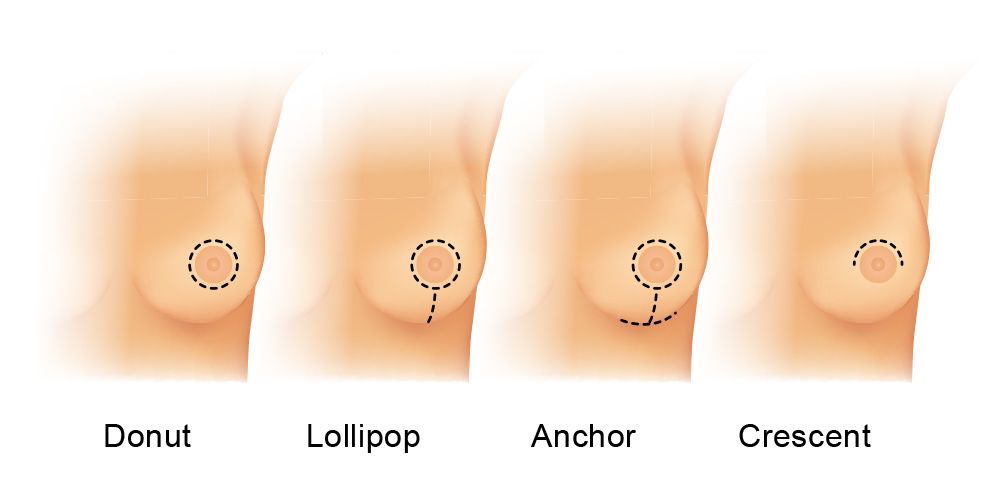
Peri-Areolar or “Donut” Lift:
Corrects Mild Sagging with a Single Scar.
This involves a circular incision running around the edge of the areola, and like the crescent lift, is commonly performed in conjunction with breast augmentation. This lift can also be effective in helping reduce areola size. The resulting scar traces the edge of the areola.
Vertical or “Lollipop” Lift:
Corrects Moderate Sagging
A vertical lift involves 2 incisions: one around the edge of the areola, and one running vertically from the bottom of the areola to the inframammary fold, creating a “lollipop” shape.
Inverted T or “Anchor” Lift:
Dramatic Reshaping to Correct Extensive Sagging
This technique involves 3 incisions: one around the edge of the areola, one vertically from the bottom of the areola to the breast crease, and one along the inframammary fold, hidden in the breast crease.
Your cosmetic surgeon may also use this technique if you are having a breast reduction with lift.
Crescent Lift:
Minimal Scarring to Correct Minimal Sagging
This involves a small incision running halfway around the top half of the edge of the areola. Usually, a crescent lift is only done when a patient is also having breast augmentation as it will only moderately improve sagging.
Complications include:
- Infection: you may need antibiotics to treat this. Getting an infection can affect the way your breasts look after surgery.
- Bleeding: including getting a collection of blood under your skin (called a haematoma). You may need surgery to stop the bleeding and drain the area.
- Keloids or hypertrophic scar: unusual red or raised scars – these may be permanent or can fade
- Uneven size and shape: possibly caused by natural differences highlighted by the surgery
- Loss of part, or even all, of your nipple or other areas of your breast, changes in blood supply can cause the tissue to die.
Breastfeeding, most women who have breast uplift surgery can still breastfeed, but this isn’t always the case. Breast uplift surgery may affect whether you can breastfeed or not, especially if your operation involved changing the position of your nipples.
N.B Remember the effects of your breast uplift surgery will not last forever, however when combined with a reduction you are more likely to achieve, longer-lasting results.
Drains
Depending on your body you may require drains after having a breast augmentation, revision or reconstructive surgery. This is to prevent any delay in healing which may occur if the fluid is not drained.
The drain is a narrow silicone or rubber tube, placed in the pocket created for the implant, during a breast augmentation procedure, to enable fluid that could build up in the pocket to drain away. Drains may be required regardless of the size of the implant used. Due to the creation of a larger raw surface of the tissue, it is more likely they will be required with larger implants.
Drains are usually required following a mastectomy or reconstructive breast surgery. You may have only one drain, or you may have five or more if you have a bilateral mastectomy with immediate reconstruction.
The location of your drains will depend on the surgery you have, but often includes a drain at your mastectomy site and one in your armpit, if you have lymph nodes removed.
Drains may also be required during revision procedures needed for complications such as capsular contracture when the breast has become hard, distorted and painful.
Infection
Drains are also used to treat infections. The drain helps to eliminate any significant accumulation of fluid around the breast implant which may also reduce the occurrence of a second infection.
Drain Bulb
The drain is accessible externally through a very small incision, and the end of the drain is connected to a small collection bulb. The bulb can be emptied and the contents measured at any given time. When the fluid coming out has decreased to a minimum, the drain tube will be removed.
Pain
Drains may increase post-surgery discomfort and pain, this normally subsides when the drain is removed. As mentioned earlier, drains are not normally used for most breast augmentation procedures.
Emptying and monitoring drainage
Your nurse will show you how to periodically drain your bulbs and you will need to keep a record of the amount of fluid each time you empty them. This is important as it will guide your consultant regarding when it is safe to remove the drains.
Always wash your hands before and after each measurement. To start with you will usually have around 100 cc drainage per day and it should be bright red, this should change to a straw colour after a few days and the amount of fluid should steadily decrease. You may need to empty your drains two to four times daily, or whenever they become approximately half full. After emptying your bulb, rinse it with water and gently compress it to make sure a vacuum is recreated when you close the system.
If you notice an increase in the amount of fluid, consider your activities during the day, it may be a sign that you need to take it easy for a few more days.
How to Prevent Surgical Infections
Consider wearing an appropriate drain management garment with pockets or pouches where you can insert the bulbs to keep them secure,
This keeps the drains secure and reduces the risk of the drains pulling on your wound site or possibly getting tangled with things.
Signs and Symptoms of Infection
Having drains provides bacteria with an access route to your body. The risk of infection begins to increase rapidly after the drains have been in place for 21 days.
Signs of a drain-related infection may include:
- A fever with a temperature of 101 degrees F (38.3 C) or higher.
- Redness of your skin surrounding the drain.
- Hardness or firmness where the drain exits your body.
- Thickening rather than thinning of the drained liquid.
- Foul-smelling drainage or pus at the entry site.
- Pain or discomfort at your drain sites.
- A sudden change in the smell or colour of the drainage.
Common Drain Problems include:
Clots in the tubing, if this occurs, try gently kneading the area.
Loss of vacuum pressure, if a proper vacuum isn’t created after emptying your bulb, your drain may fail to remove the fluid. This will cause a build-up up of fluid, seek advice if you are experiencing a higher level of discomfort than previously.
Drain site infections are not uncommon and are more likely the longer your drains are in place.
When to Call Your Consultant
You should call your surgeon if you have any concerns or questions at all, or if you develop any of the following problems:
- If your drainage is bright red for more than two or three days.
- If you develop any signs or symptoms of an infection as noted above.
- If a large amount of fluid is leaking from where the drain tubing is inserted into the surgical site.
- If your drainage output suddenly decreases or stops abruptly.
- If your drainage becomes thicker rather than thinner as time goes on.
- If your bulb loses suction.
- If your drain falls out.
Removal
Normally drains used during a breast augmentation surgery will be removed the day after the procedure. If you have stayed overnight in a hospital this will be done before you leave. If you have had your procedure as an outpatient you would go back to the hospital or consultants rooms. On occasion, it may be necessary for the drains to stay in for longer although for a straightforward breast augmentation it is unlikely they will remain in for longer than 48 hours after your procedure.
Drains placed in patients following a mastectomy and reconstruction with implants may need to remain in place for two to three weeks, others may need to be left in place for longer than three weeks.
Your consultant will remove your drains by cutting the suture holding them in place and gently pulling out the tubing. This may cause some discomfort, however, this will normally only last a few minutes. Most people do not need any pain medications for this procedure.
You will have small scars where the tubing exited your skin, but these often fade over time.
RECENT ADVANCEMENTS
Internal Bra
There are various methods for the internal bra procedure which can be used to correct a multitude of issues arising after breast augmentation including:
Bottoming out
The implant drops due to stretched skin
Lack of fullness
The appearance of droopiness and a lack of fullness due to stretched skin)
Fold malposition
The breast border has moved to cause the implant to shift down or to the side
Symmastia
The implants are too close together or touching
Rippling
The appearance of irregular contours such as wrinkles or ripples on the skin surface.
Capsular Contracture
Hardened scar tissue forms around the implant causing tightness and changes in appearance.
Malposition of Implants
Implants that don’t sit at the same level or are placed too close together or too far apart.
Contour irregularities (double bubble)
Method 1
This method involves expanding the implant pockets (capsulotomy) superiorly and medially, creating room for the implants to be repositioned at a higher level. The part of the pocket that rests laterally and inferiorly is then closed using permanent sutures for a long-lasting result. The sutures are carefully placed so that the suture material is never in direct contact with the implants inside the body. The internal bra should then help to support the breast implants, creating better cleavage and improved fullness in the upper pole of the breast.
Method 2
Can be used alone or with implants.
Biologic tissue is secured to your chest wall, creating anchored support that enhances the shape of your breasts. It only takes a few weeks for the biologic tissue to become fully incorporated into your natural tissue. Because the internal bra tissue and your chest wall take on most of the weight of your implants, your skin is less likely to stretch and sag. May be used when large implants are desired to prevent implant malposition.
The Orbishape
A bra-shaped silicone sling is another alternative designed to be placed inside of the natural breast tissue.
“Think of it as a hammock that sits underneath your breast to keep it supported, or like the bottom part of an underwire bra,” said Yossi Mazel, the chief operating officer of Orbix Medical, a medical device company based in Tel Aviv, Israel.
To place the Orbishape, a small incision is made in the breast crease; the device is then inserted and attached to the ribs and breastbone with both titanium anchors and surgical threads. The recovery time after surgery is minimal. Best of all, the internal bra is said to help patients heal faster from their Breast Augmentation, and reduce the appearance of surgical scars.
Recently submitted for review by the Food and Drug Administration, approval for the Orbishape has still not been confirmed. In some European countries including the UK, it has already been approved for use.
Internal Bra Mastopexy
Procedure – Breast Lift
To minimize visible scarring, an exterior circumareolar incision on the skin is combined with an internal inverted-T moulding of the breast tissue on the inside. Through the exterior incision, the skin is separated from the breast tissue. The outer skin is lifted and reduced in a circular pattern. Through the internal inverted-T incision, the breast tissue is lifted and moulded into more youthful shape. An acellular dermal (ACD) matrix to create an internal bra that attaches to the chest wall, which eventually becomes incorporated into the breast tissue. The ACD matrix provides extra structural support to the lower breast to prevent future sagging from occurring.
Biplane Placement
Correction of Implant Malposition
The concept of the biplane muscle splitting technique was only introduced by Umar D. Khan in 2007. The implant is positioned both in front of and behind pectoralis major simultaneously without the need for muscle release.
As the muscle-splitting technique only divides the medial two-thirds of the pectoralis major, this maintains the lateral portion of pectoralis major which can help prevent a double bubble.
The biplane technique can be used in cases of grade I and II ptosis with satisfactory lower pole fill and projection.
In conclusion, this novel biplanar technique for breast augmentation optimizes the advantages of subglandular and submuscular breast augmentation with simpler dissection and fewer complications than other submuscular techniques. It can be used in a wide variety of breast types with predictable results.
Capsular Flap
Correction of Implant Malposition
Capsular flaps can be utilised to reinforce capsulorrhaphy. This simple and effective technique creates a capsular sling of vascularized tissue and allows placement of the suture line away from the maximum weight of the implant.
Neopectoral Pocket
Correction of capsular contraction
Implant malposition
Another technique that is used as an alternative is to insert the new implant into a pocket created by developing a subpectoral space between the anterior wall of the capsule and the posterior surface of the pectoralis major muscle using a periareolar or inframammary approach.
There are several advantages to neosubpectoral pocket, pectoral coverage conceals contour deformities or rippling and is preferred to sub-glandular site exchange in patients with a lack of overlying breast tissue.
MY ADVICE
Don’t Panic! In the majority of cases, complications or dissatisfaction with the aesthetic appearance can be corrected to a patients satisfaction. I have had 3 breast augmentations performed by the same surgeon, to achieve the size and shape I desired. You can read more about it in my Breast Augmentation post. Take time to choose a surgeon to perform your revision surgery. Speak with your surgeon who performed your first breast augmentation and ask for their advice. They will know the most about your skin, tissue and internal pocket as they have already operated on you.
However, if your initial surgeon has caused a complication due to a surgical error ie the pocket is too large or the implant position is incorrect you may be wise to find an alternative surgeon. Personally I would choose a surgeon who performs reconstructive surgery after mastectomy.
BIA-ALCL
CAIMPLANTSNCER LINKED TO BREAST
I have one of the styles of implants that have been recalled and in the light of all the evidence, I have chosen to keep my implants. My decision is partially based on my trust in my consultant and his ethics.
The FDA is not recommending the routine removal of these or other types of breast implants in patients who have no symptoms. https://www.fda.gov/
To put the current statistics into perspective the risk of getting BIA-ALCL with Allergan implants is extremely low, with the percentage chance being 0.026%. In comparison, the risk for any women being diagnosed with breast cancer is 12% (U.S.A) and 14%
(UK).BREASTCANCER.ORG
https://www.cancerresearchuk.org/
Breast cancer is the most common cancer in the UK and 8% of cases each year are caused by drinking alcohol. The risk increases even at low levels of drinking.
https://www.cancerresearchuk.org/about-cancer/causes-of-cancer/alcohol-and-canc
QUESTIONS
Ensure you ask about what methods below, are being used for your revision procedure.
Incisions
Inframammary (in crease under breast)
Transaxillary (armpit)
Peri-areolar (nipple)
Placement
Subglandular (above the muscle)
Dual-Plane (partially above and beneath the muscle)
Biplane (new technique not used very often)
Implants
Non-anatomical / Anatomical (teardrop)
Silicone/Saline
Implants Style Guidelines
Non-anatomical
Size – biggest cc volume
Shape – tends to favour a fake look with more volume in the top of the breast and a more defined cleavage.
Anatomical
Size – will limit cc volume
Shape – More natural breast shape.
Saline
Implants that rupture will noticeably change shape.
More likely to cause ripples on the surface of the breast.
2% deflation rate per year
Silicone
Implants can rupture and you may not be aware.
Less likely to ripple.
Silicone Shell
Textured – Often used for anatomical implants to prevent them ‘flipping’ or moving and distorting the breast shape.
Smooth – Linked to higher rates of capsular contraction but less wrinkling of the implant shell.
Expandable
Tissue expanders
A permanent expandable implant is a saline lumen inside a silicone gel lumen, this was developed to help to prevent visible rippling that can occur with expandable saline implants.
All expandable implants have been linked to higher infection rates due to the external port in the armpit needed for adding saline. Warranty becomes void when overfilled.
In addition ask the below questions:
- If they have any complaints registered against them with the GMC.
- How many times they’ve performed this operation in the last year.
- How many times they’ve had to do revision surgery (additional surgery to repair or change something they’ve already done).
- After your consultation goes over all the information provided.
- Make sure you feel comfortable with the reasons behind why, the consultant has advised you to have the incision and placement, discussed.
- Ensure you know the manufacturer and style and size of the implant being used.
- Do you feel confident your consultant knows what you are wanting to achieve?
- Ask to see before and after photos, however, always remember that you are only seeing the best of the consultants work.
CHECKLIST FOR SURGEONS
UK
You should check if someone is a registered doctor or surgeon on the General Medical Council online register.
Check your surgeon has FRCS (Plast) after their name.
Some surgeons may also be on a specialist cosmetic surgery register, such as:
The British Association of Aesthetic Plastic Surgeons (BAAPS)
The British Association of Plastic, Reconstructive and Aesthetic Surgeons (BAPRAS)
In addition check, the hospital or clinic is registered with the Care Quality Commission (CQC), or ask them to show you its certificate.
USA/CANADA
Board Certification
A good sign of a U.S. surgeon’s competence is board certification, meaning a surgeon holds certification by a surgical board that is approved by the American Board of Medical Specialties.
In Canada, a qualified surgeon attains his or her certification by the Royal College of Physicians and Surgeons of Canada.
When you choose a surgeon who is properly certified in a surgical specialisation, you are assured that he or she has completed years of residency training in his or her speciality and has demonstrated knowledge and competence by successfully completing a rigorous examination.
Fellowship in the American College of Surgeons
The letters F.A.C.S. (Fellow of the American College of Surgeons) after a surgeon’s name are an indication to the patient that the surgeon has passed a thorough evaluation of both professional competence and ethical fitness. Fellows are board-certified surgeons or, in unusual circumstances, have met other standards comparable to board certification
I am forever grateful, that I had a consultant, that cared enough to spend hours talking to me and helped me to make the right decisions.
Although there is no evidence that silicone or oils improve scars, I highly recommend using silicone strips, I used them after my second and third breast augmentations and my scars are flatter and finer than they were after my first breast augmentation. The only topical scientifically and clinically proven to lessen scar thickness is Solution for Scars, from http://www.scienceofskin.com – developed by Douglas McGeorge. I hope this is helpful, I am always happy to speak with anyone who wants any more guidance.
MARINE COLLAGEN BODY LOTION
Collagen rich hydrating full body lotion. £11.50 Collagen is the main structural protein present in the skin. It gives body tissues form, strength and firmness. Ruptures in our collagen structure are also responsible for stretch marks. Marine Collagen Body Lotion contains pure concentrates of marine collagen in a smooth indulgent lotion helping to contribute to your collagen production.
https://www.gmc-uk.org
https://baaps.org.uk
http://www.bapras.org.uk
SURGERY ESSENTIALS
Scar Revision and Treatments Info
Nutrition, Stress and Skin Care Info
Smoking, Nicotine and Surgical Complications Info
Post Surgical Garments for Optimal Recovery Info
